
Online Documentation for SQL Manager for PostgreSQL
Input field and status bar
Input field
The input field is located at the bottom of the assistant panel.
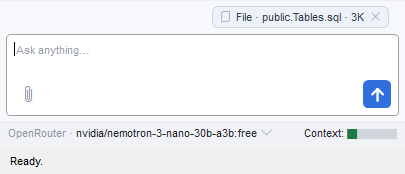
To send a request, press Enter or click the send button at the right edge of the field. To start a new line within the request, press Shift+Enter.
When the input field is empty, the Up and Down arrow keys let you browse the requests already sent in the current conversation, from the most recent to the earliest; the selected request appears in the input field. Browsing stops as soon as you edit the text, send the request, click anywhere in the field or in the chat view, or press Esc; Esc also clears the text that was placed into the field. Identical requests sent one after another (after a reply has been regenerated, for example) appear only once while browsing.
The paperclip button attaches a text file to the request. The maximum file size is set by the Attached file size limit, K tokens option. Only text files can be attached: the program examines the contents of the file rather than its extension, so a binary file such as an archive, an image, a PDF or an executable is rejected even if it has been renamed.
The context chips above the input field show the data that will be sent with your next request. You can remove any chip before sending.
While the assistant is preparing a reply, the send button is replaced with the Stop button. The input field stays active: you can type your next request, but Enter neither sends it nor stops the assistant. The only way to stop generation is to click Stop — whatever you have typed stays in the field.
Status bar
Below the input field, the status bar shows which model the assistant is using (Provider · model). To change the active provider, use the Endpoints tab of the Environment Options dialog. To change the model without opening the options, click the model name — the Select model window opens.
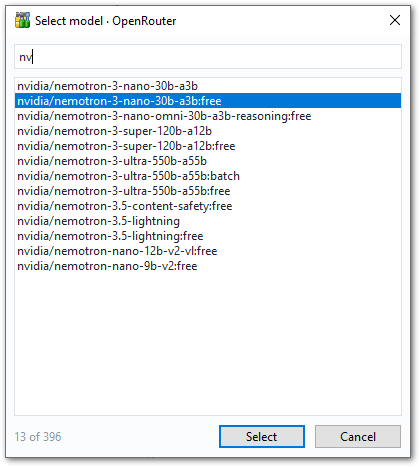
This window lists the models available from the selected LLM provider. Use the filter box at the top to narrow the list; the number of matching models is shown below it.
To select a model, click Select, press Enter or double-click a model in the list. To close the window without any changes, click Cancel, press Esc or click the window close button.
The model you select is used until you restart the program or select another one; the default model set for the provider on the Endpoints tab remains unchanged. Changing the model does not reset the current conversation — you can switch models midway, and the assistant continues with the full conversation history.
On the right, a context size indicator shows the size of the context accumulated over the whole conversation. The value is recalculated after each request and does not include unsent context chips or the request you are typing.
The appearance of the indicator depends on the Warning threshold, K tokens option. If a threshold is set, the indicator is displayed as a bar of five segments, each representing 20% of the threshold: the bar is green up to three segments, orange at four and red at five. The exact context size is shown in the tooltip. If the threshold is 0, the indicator shows the context size as text instead.
Exceeding the threshold does not prevent a request from being sent — the indicator only warns you that the context is getting large. See Tokens for details on how the context size is calculated.
A status line at the bottom of the panel shows the current state of the assistant.
See also: