Online Documentation for SQL Backup for SQL Server
Specifying backup source
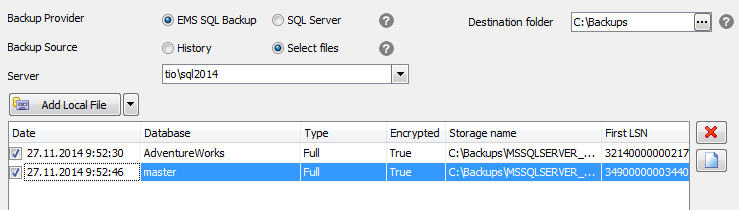
On the first step of the wizard you need to specify the backup source and the destination folder on the local machine.

Destination Folder
Specify the destination server folder where backups will be transferred to. This folder is set relatively to the local machine.
Backup provider
You need to select the provider that had been used for creating the backup.
Backup source
History - shows the list of the available database backups for the specified server and database. Only backups of corresponding provider types are displayed.
Select Files - allows selecting individual backup files from the server.
Server
Select the server to get database backup from.
Database
Select the database to get backups for. If History backup source is selected, the list of 20 latest backups is displayed. Use Get more... button to access older backups. If Select Files source is selected, you need to add the files manually.
Add Local File
Click this button to search for the backup files on the selected server. If backup consists of multiple files (this option is only available for EMS SQL Backup type) you need to specify the first file from the chain. For other file options use the down-arrow button.
Add Network File
Use this option to select the file from the network.
Add Cloud File
The Select cloud dialog is opened. You need to select the cloud to get a backup file from.
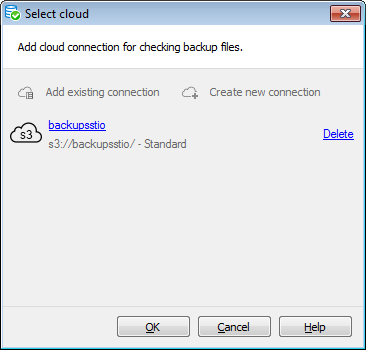
You can create a new connection using Create new connection link. To add the existing connection set in Cloud Connections dialog at Options use Add existing connection item.
If you create a new connection, you can save it after all options have been set. If you need to edit an added connection click its name to open the corresponding dialog.
After all options have been set, click the OK button to get the files from the cloud. If the connections is set successfully and the user has appropriate permissions, the Select file dialog opens with the list of available files.
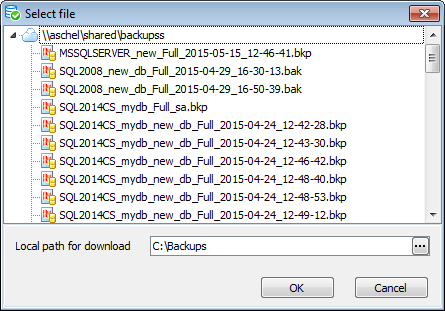
Select the backup file and set the local folder for upload at Local path for download. Click the OK button to upload the selected file to the server. If the file has been uploaded successfully, you can proceed to the next step.
![]() Remove
Remove
Use it to remove the selected file from the list.
![]() Clear
Clear
Use it to remove all files from the list.
If you have selected the files from History, proceed to the Selecting backup files step.
If you have used Select files option, proceed to the Viewing summary information step.


