
Online Documentation for Data Generator for InterBase/Firebird
Step 1 - Setting connection properties
At this step you should enter the necessary settings to establish connection to Interbase/Firebird server.
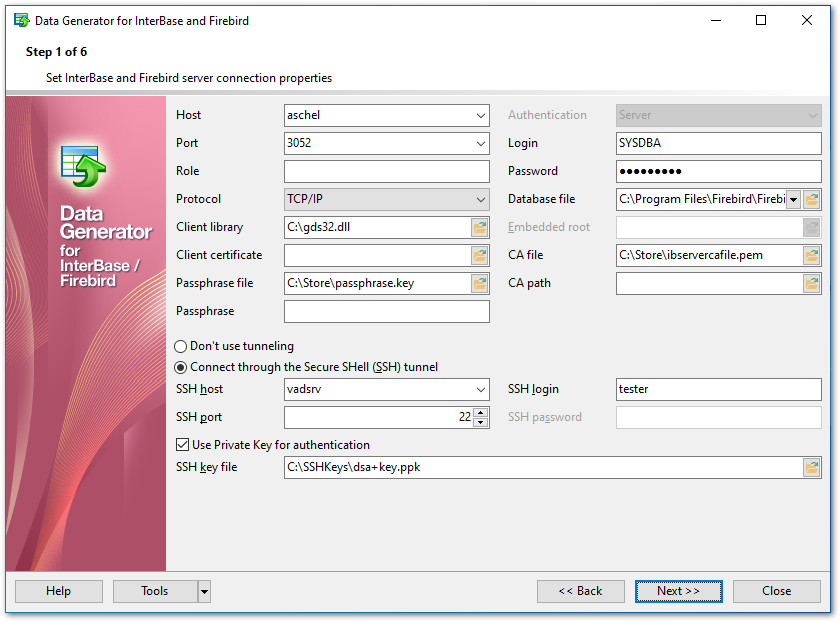
For connection you should also enter Interbase/Firebird host name in the Host field, specify the preferable Network protocol (TCP/IP, NetBEUI, Novell SPX, Local, Embedded) and enter Interbase/Firebird port (or service name) to connect through in the Port field.
Afterwards you should specify authorization settings: Login and Password.
The default superuser name is 'SYSDBA' and the default password is 'masterkey'.
Authentication
This group is only available in case you connect to Firebird 2.1. Specify the preferable type of server authentication to be used for the connection:
![]() Normal
Normal
![]() Win32 NTLM authentication
Win32 NTLM authentication
![]() Mixed
Mixed
You also need to specify the path to the Client library and the path to the Database file (*.gdb for InterBase or *.fdb for Firebird) in the corresponding fields. For successful connection to the server it is crucial to use the appropriate client library - the one that is compatible with the server you are using: gds32.dll for InterBase and fbclient.dll for Firebird. Please note that the client library file must be located on your local machine (e.g. in the directory where the utility is installed). Bear in mind that the path to the database file should be set relatively to the Interbase/Firebird server file system.
Embedded root
In Firebird 2.1 (and lower) the embedded server root is a directory where the executable file fbguard.exe is stored.
In Firebird 2.5 it is a directory that contains fbembed.dll file.
In the latest version of the server fbclient.dll library can be used as a client library for the embedded server.
An embedded server locks a database file for its own exclusive use after successful connection. This means that you cannot access the same database from multiple embedded server processes simultaneously (or from any other servers, once an embedded server has locked the file).
If necessary, specify the preferable Role to be used by the application.
Please note that you should have sufficient privileges to write to the destination database on Interbase/Firebird server.
If you are using the EMS SQL Management Studio for Interbase/Firebird version of Data Generator for Interbase/Firebird then the Select registered database button is available. Click this button to pick a database already registered in the EMS SQL Management Studio in the Select Host or Database dialog.
SSL parameters
SSL preferences allows you to connect to the server via encrypted channel for increased security.
- Client certificate - set the full path to the SSL certificate on the client machine.
- Passphrase file - set the full path to the file containing the key passphrase.
- Passphrase - input passphrase password.
- CA file - specify the name of the certificate authority file.
- CA path - set the path for the location of the certificate authority file.
Tunneling settings
To setup the connection via SSH tunnel, input the following values in the corresponding fields:
- SSH host name is the name of the host where SSH server is running
- SSH port indicates the port where SSH server is activated
- SSH user name stands for the user on the machine where SSH server is running (Note: it is a Linux/Windows user, not a user of Interbase/Firebird server)
- SSH password is the Linux/Windows user password
For details see SSH tunneling options.
When you are done, press the Next button to proceed to the next step.


