Online Documentation for Data Pump for MySQL
Step 1 - Setting connection properties
At Step 1 of the wizard you should set the source and the target database connection properties.
Please note that you need to have sufficient privileges to be able to write to the destination database on MySQL server.
Note: To establish connection to the source database, it is necessary to use additional software, namely data sources (OLE DB Providers and ODBC Drivers) which are distributed by DBMS developing companies and third-party developers. EMS Data Pump processes information received from the data source. The utility itself extracts neither data nor metadata from the source database. Therefore the functionality of Data Pump may be partially limited by the abilities of data source being used.
Source database connection properties
In order to set the source database connection properties, use Data Link Properties builder or select an initialization string from the list of previously built ones. To call the Data Link Properties dialog, press the Build button.
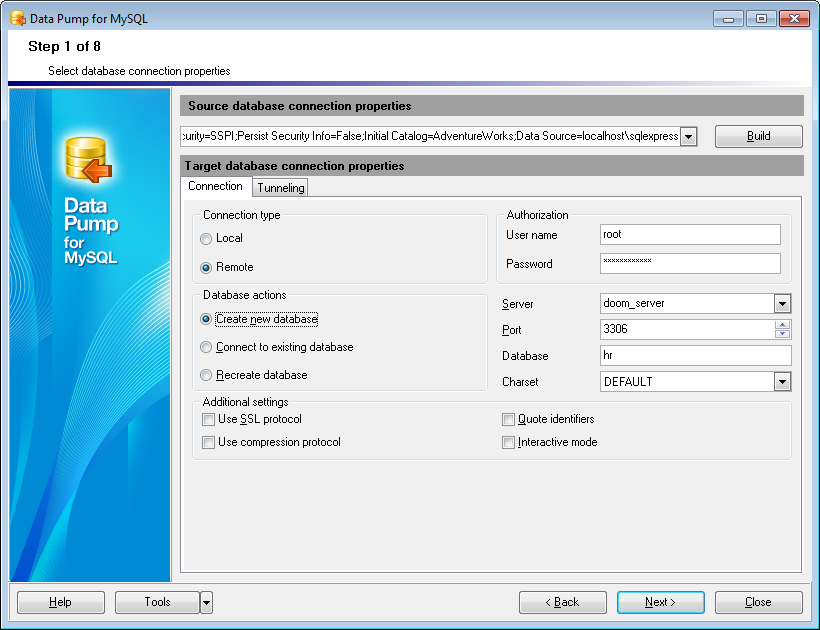
Target database connection properties
First select the connection type: ![]() local or
local or ![]() remote.
remote.
Local connection is used to connect to MySQL server running on the same machine where Data Pump for MySQL is launched.
The Remote mode allows you to connect to MySQL server running on another computer in the network.
Database actions
You can also set the preferable database action:
![]() Create new database
Create new database
Select this action to create a new database on the target MySQL server to pump data into this database.
![]() Connect to existing database
Connect to existing database
Select this action if the target database for pumping data already exists.
![]() Recreate database
Recreate database
If this action is selected, the target database will be dropped and then recreated (NB: you will lose all data previously stored in the specified database in this case).
Authorization
Here you must specify valid authorization info to access the target MySQL server: User name and Password.
The default superuser name is 'root' with an empty password.
Server
For remote connection you should enter MySQL host name in this field, or select one from the drop-down list.
Port
Use this field to specify a port to connect through.
Database
Type in the name of the target database for pumping data, or select one from the drop-down list.
If necessary, use the drop-down list to specify the preferable Charset to be used by the application.
Additional settings
![]() Use SSL protocol
Use SSL protocol
Enables interchanging data with remote MySQL server via encrypted channel, not allowing intruders to intercept your data.
Note: This option works only with servers that support SSL connections.
![]() Use compression protocol
Use compression protocol
Enables using the compressed data protocol when connecting to the database server.
![]() Quote identifiers
Quote identifiers
Enables quoting all the identifiers with the backquote symbol ('`').
Note: This option works only with servers that support quoting aliases.
![]() Interactive mode
Interactive mode
Enables using the interactive_timeout variable value from my.cnf file instead of wait_timeout for connection timeout.
If you are using the EMS SQL Management Studio for MySQL version of Data Pump for MySQL then the Select registered database button is available. Click this button to pick a database already registered in the EMS SQL Management Studio in the Select Host or Database dialog.
Tunneling settings
To setup the connection via SSH tunnel, input the following values in the corresponding fields:
- SSH host name is the name of the host where SSH server is running
- SSH port indicates the port where SSH server is activated
- SSH user name stands for the user on the machine where SSH server is running (Note: it is a Linux/Windows user, not a user of MySQL server)
- SSH password is the Linux/Windows user password
For details see SSH tunneling options.
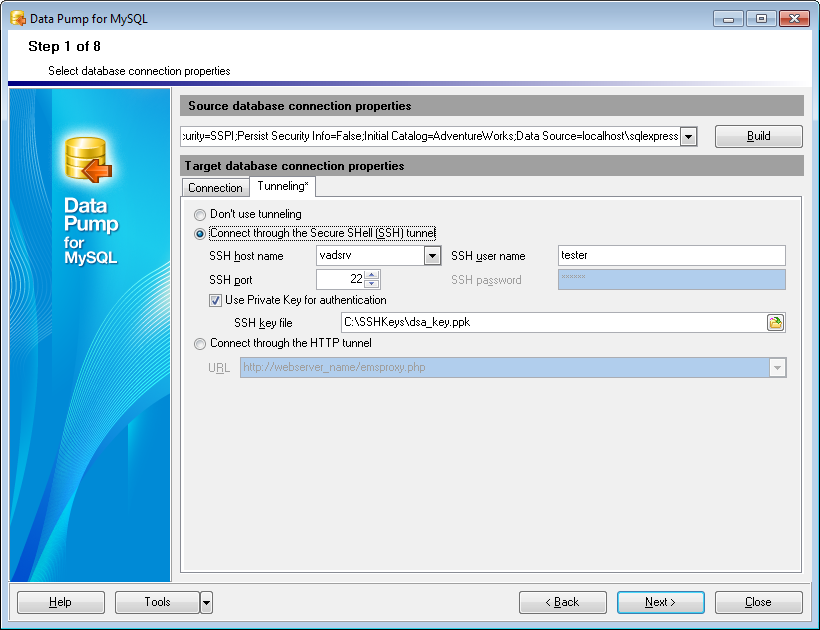
To use HTTP tunneling, just upload the tunneling script to the webserver where MySQL server is located, or to any other webserver from which direct connections to your MySQL server are allowed. This script exposes the MySQL API as a set of web-services which is used by Data Pump for MySQL.
For details see HTTP tunneling options.
When you are done, click the Next button to proceed to the selecting source schemas step of the wizard.


