Online Documentation for Data Comparer for InterBase/Firebird
Step 2 - Setting tables and fields correspondence
At this step you should select objects for data comparison.

Setting table correspondence
The upper grid allows you to set correspondence between tables of the source and the target databases. If you wish to setup correspondence between tables (as well as between their fields) automatically on the basis of equivalence of their names, press the Autofill tables and fields button. If no correspondence is set for a table, it will not be included in the data comparison process.
kpfkpk
For your convenience the Mask for autofill of object names is added. The filter is intended for excluding unnecessary tables from auto filling.
You can use standard wildcards like asterix (*) or percent sign (%) which are the same, or the question mark (?). To exclude the object names set in the filter, use the exclamation mark (!) at the beginning, e.g. the result for !T* stands for all objects except the object names starting with T. If any of these symbols presents the name of the object and you do need to apply filter to them, just double that symbol, e.g. the result for !!T* will result in all objects with names that start with !T.
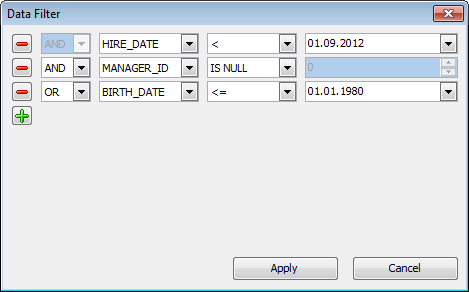
Click the ![]() button in the Data Filter column to set filter for comparing data. Only data within specified condition will be compared and synchronized.
button in the Data Filter column to set filter for comparing data. Only data within specified condition will be compared and synchronized.
Use ![]() \
\ ![]() buttons to Add\Remove conditions and drop-down lists to select column names and operators.
buttons to Add\Remove conditions and drop-down lists to select column names and operators.
Note: You can apply either OR or AND operator between conditions.
Setting field correspondence
The lower grid allows you to set correspondence between table fields of the source and the target databases. If you wish to set up correspondence between table fields automatically on the basis of equivalence of their names, press the Autofill fields button. Please note that you can set field correspondence for fields of identical data types only. If no correspondence is set for a field, it will not be included in the data comparison process.
Tick off the checkboxes in the Key Field column for those fields which will be used as key columns to determine appropriate records in the tables being compared. Please keep in mind that you can define a key field only after a correspondence has been set for this field.
Note: you can define options for multiple tables/fields at a time by using the context menus implemented for your convenience in the Setting table correspondence and the Setting field correspondence grids.
Attention! You should define at least one key field for each pair of tables, otherwise they will be painted red, and you will be unable to proceed.
![]() Ignore case when comparing strings
Ignore case when comparing strings
Set this option for case-insensitive comparison of strings.
![]() Compare BLOB values
Compare BLOB values
Set this option to compare the content of the BLOB fields.
![]() Trim CHAR fields
Trim CHAR fields
Set this option to trim CHAR fields on synchronization. Note, that if data only contains spaces it will be regarded as empty string (''). If the option is off data is processes as is (including spaces at the end of the string).
When table comparison is complete the Summary dialog appears. This dialog provides you with common information about the result of table(s) comparison. The number of identical, different, missing and additional records for each pair of tables can be found at the corresponding columns of this report.

Check the Do not show summary option if there is no need in this dialog. The Show summary dialog after comparison option at the preferences dialog allows you to manage this dialog appearance. You can sort data in a column by clicking the column caption.
When you are done, press the Next button to proceed to the next step.


