

Online Documentation for Data Import for MySQL
Step 6 - Settings data formats for each field
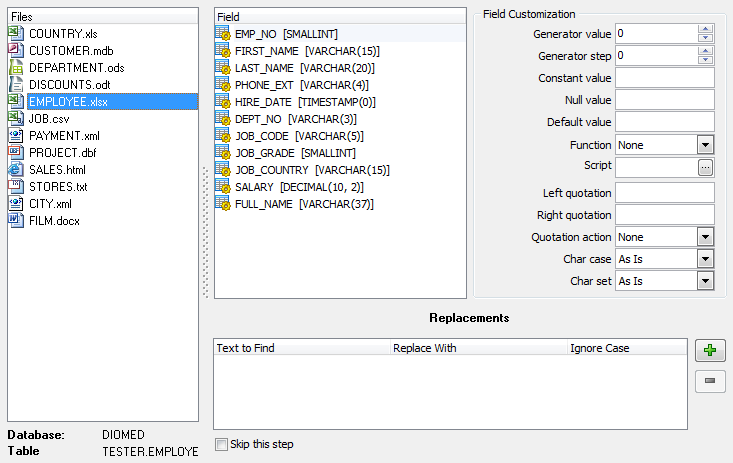
This step of the wizard allows you to set formats for each imported field separately, in case additional formatting is required.
Select a field in the list and use the Field Customization group to adjust format options that will be applied to this field only: generator value, generator step, constant value, NULL value, default value, function, script, left/right quotation, quotation action, character case, character set.
Generator value
Use this field to set the initial value of the autoincrement field.
Generator step
Set the step of the autoincrement field. If it is 0 or if the field is of Identity one, then the value of the generator will be ignored.
Constant value
Use this field to set a constant value for the field.
Null value
Set the value which will be considered as NULL to set the default value.
Default value
Set the default value of the NULL field.
Function
Use the drop-down list to select one of the function return values that can be set in the field: Date, Time, Date&Time, Long File Name, Short File Name.
Script
Press the ![]() button to add/edit the script in the Script Editor.
button to add/edit the script in the Script Editor.
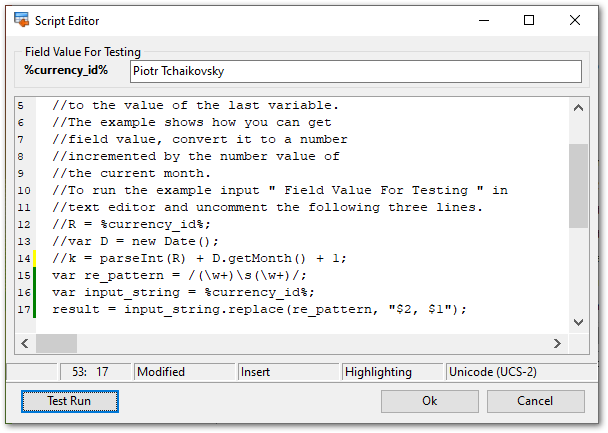
Use the Script Editor window to enter the script for the field processing. Here you can use all features of the MS JScript.
The picture above shows the example of the Jscript use for the field Name processing. The entered code converts the 'XXXX YYYY' string to the 'YYYY, XXXX' one, for example 'Piotr Tchaikovsky' -> 'Tchaikovsky, Piotr'.
If you want to test your code and see the result of its execution then enter the test field value in the Field Value For Testing box and click the Test Run button.
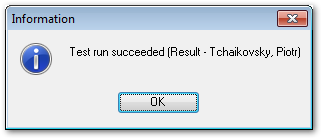
If the execution fails you see the message box with the description of an occurred mistake.
If the execution succeeds you see the message box with the result as it is shown on the picture below.
Quotation
Left quotation
Set a character or a number of characters to denote quoting in the imported string.
Right quotation
Set a character or a number of characters to denote unquoting in the imported string.
Quotation action
You can select the Add item to add quotation marks to the imported string, the Remove item to remove all the quotation marks from the imported string, or the None item to save the original quotation marks.
String conversion
Char case
Set the case of the imported string. As Is keeps the original string unchanged, Upper sets the whole string to the upper case, Lower sets the whole string to the lower case, UpperFirst sets the first character of the string to the upper case, UpperFirstWord sets the first character of each word to the upper case.
Char set
Set the char set of the imported string to ANSI or OEM. As Is saves the original character set of the string.
The Replacements area allows you to set the text you need to be replaced during data import into the selected field. Press the Add Replacement... ![]() button to specify a new replacement options using the Add Replacement dialog.
button to specify a new replacement options using the Add Replacement dialog.
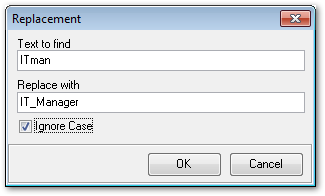
Define the text to replace and the value to replace with in the appeared dialog window. Check the Ignore Case option to make replacement case-insensitive.
To remove a replacement, select it in the list and click the Delete Replacement... ![]() button.
button.
![]() Skip this step
Skip this step
Check this option to skip the current step in the future. To edit the list of skipped steps, use the Skipped Steps group available in the General section of the Preferences dialog.
When you are done, press the Next button to proceed to the next step.


