

Online Documentation for SQL Manager for PostgreSQL
Using Navigation bar and Toolbars
When the Data tab (in Table Editor, View Editor) or the Result(s) tab (in Query Data, Design Query) is selected, the Navigation bars of these tools contain the Data Management group which allows you to:
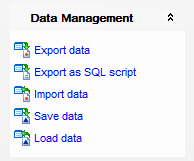
![]() import data (in Table Editor, View Editor only)
import data (in Table Editor, View Editor only)
![]() save data (in Table Editor only)
save data (in Table Editor only)
![]() load data (in Table Editor only)
load data (in Table Editor only)
Items of the Navigation bar are also available on the ToolBar. To enable the toolbar, open the Environment Options dialog, proceed to the Windows section there and select ![]() Toolbar (if you need the toolbar only) or
Toolbar (if you need the toolbar only) or ![]() Both (if you need both the toolbar and the Navigation bar) in the Bar style for child forms group.
Both (if you need both the toolbar and the Navigation bar) in the Bar style for child forms group.
The Navigation pane contains toolbars allowing you to:
![]()
- go to the first record of the dataset;
- go to the previous page;
- go to the previous record;
- go to the next record;
- go to the next page;
- go to the last record of the dataset;
- insert a new record (in Table Editor only);
- delete the selected record (in Table Editor only);
- edit the selected record (in Table Editor only);
- post edit (in Table Editor only);
- cancel edit (in Table Editor only);
- refresh data;
- set bookmark;
- go to saved bookmark;
- call the Filter Builder dialog;
- search for a string in the currently selected column data;
- enable/disable including data of descendant tables;
- specify the maximum number of records (record limit) for displaying data (in Table Editor, View Editor only);
- navigate within the dataset using the specified record limit (in Table Editor, View Editor only).
The Toolbar of the Print Data mode allows you to:
![]()
- customize the report using Report Formatter and the Report Options dialog;
- load a report from an external *.rps file;
- save the current report to an external *.rps file;
- print the report using the default printer;
- set printing options using the standard Print dialog;
- call the Page Setup dialog;
- show/hide report thumbnails;
- customize the Report Title;
- add Date and Time, Page Numbering, show/hide empty pages;
- shrink the report to the page;
- specify background color;
- zoom in/out, setup zoom, zoom page width, whole page, two/four/multiple pages;
- select the active page of the report;
- go to first/previous/next/last page of the report.
The Toolbar of the BLOB View mode allows you to:
![]()
- select a BLOB column;
- select encoding (ANSI, UTF-8, UNICODE-16);
- load BLOB content from an external file;
- save the BLOB column content to an external file;
- cut/copy/paste selected text to/from clipboard (enabled for the Text and Rich Text tabs only);
- undo changes;
- print the text (enabled for the Text, Rich Text and HTML tabs only);
- select font to be applied to the selected text (enabled for the Rich Text tab only);
- select font size to be applied to the selected text (enabled for the Rich Text tab only);
- make the selected text bold/italic/underlined (enabled for the Rich Text tab only);
- align left/center/right (enabled for the Rich Text tab only);
- add/remove list bullets (enabled for the Rich Text tab only).


